|
|
|
|
|
This is first my venture into Video Rocketry. Strangely
enough, it was not my initial goal to put a camcorder in a rocket. All I
wanted to do was add some weight to the nose of my
LOC Onyx. I had found that
there was significant enough weight change when using a G64 that the rocket
became unstable enough to be very susceptible to winds. I needed to add about
2 oz. to the tip of the nose cone, and was trying to figure out ways to do
that when I discovered the AipTek
Pocket DV2 or DVII.
It can record 320x240
video at 10fps onto a Compact Flash card (50-70 minutes on a 256MB card).
With 2 AA rechargeable batteries it weighs 184g and measures in at 3.3"
x 2.7" x 1.6", just right to bring the Onyx into stability when
mounted in the base of the nose cone. AipTek had a refurbished unit on their
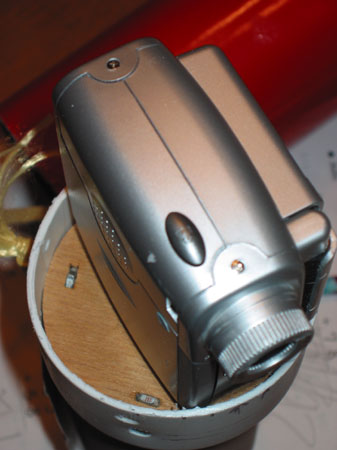
site for $69.99, so I ordered it and proceeded to modify the LOC nose cone
for the Onyx. |
|
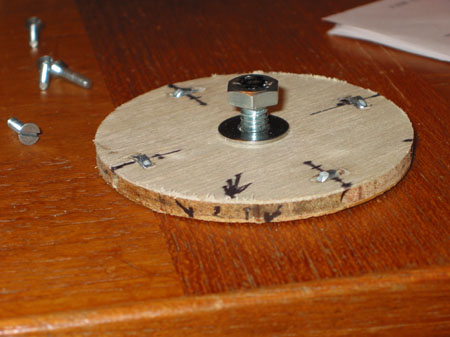
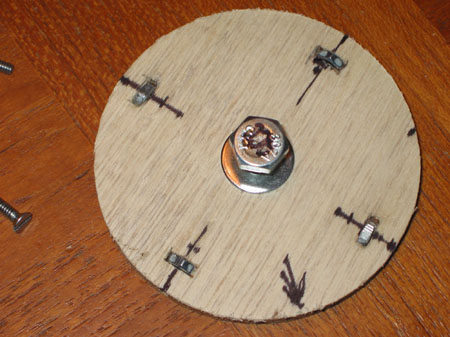
I cut the bottom half of the shoulder off and first installed an eyebolt in the base to make sure I wouldn’t loose it. I then cut a 1/8” plywood bulkhead to fit inside the bottom half of the shoulder. I was going to mount the camera onto the bulkhead using a bolt going through the bulkhead and into the ¼” tripod thread on |
|
|
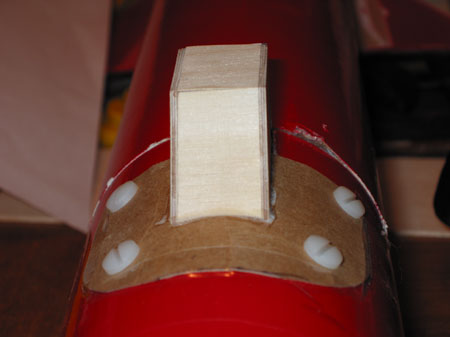
the bottom of the camera, so I drilled a hole in the center of it. I then drilled 4 holes in the edge of the bulkhead and scroll sawed small rectangles through the face so I could insert the mounting nuts for the bulkhead. The screws would go through the nose cone shoulder and into the bulkhead, thus securing it into the base of the nose cone. Then I needed a way to put the two pieces of nose cone back together again. Since the camera was such a tight fit, I had to grind out the inside of the nose cone in some places it was so tight, any type of standard tube coupler wouldn’t work. So I made two cardboard laminated pieces that I fastened to the inside of the nose cone with screws from the outside. |
|
|
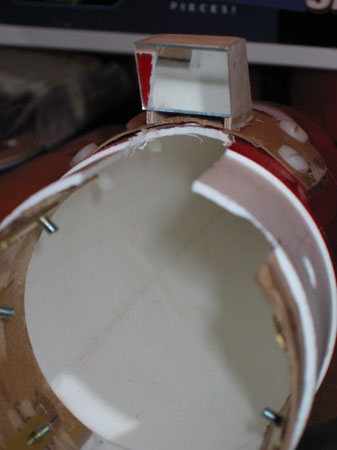
On the inside I used brass strips running vertically and threaded for the screws, three on one side and two on the other. I initially tried using CA to fasten the cardboard onto the inside of the nose cone, but even though it seemed to work, it popped off with medium pressure, that’s why I went with the screws. You’ll also notice that I cut a slot in the top half of the shoulder of the nose cone to accommodate the lens. (It’s 2.7” front to back if you don’t count the lens) Now that the camera mount was done, it was time to move on to the next step, the mirror assembly and cowl. I didn’t want to have a view directly out the side of the rocket, but down the length. |
|
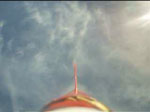
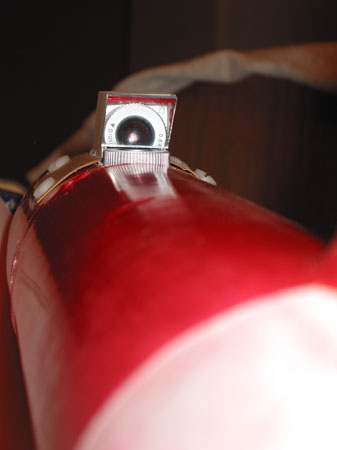
During the evolution of the cowling I created to house the mirror system I discovered a few things. Number one, if you use a 45° angle your field of view will include a lot of the rocket’s body tube, to me not desirable. By the way, I found this out because I made a cowl with a 45° angle, and installed it, 50% of the picture was the body tube. To find the optimal angle I installed the camera in the bottom of the nose cone and put the mirror in front of the lens with a protractor next to it. I then proceeded to adjust the angle of the mirror until I could just see the edge of the nose cone in the picture. For this rocket setup, I came up with 50°. |
|
|
I don’t know if this will work with all rockets, but it seems 45° will always give you too much of the body tube in the field of view. Since I had made a cowl previously, and it seemed to have worked, I basically copied the measurements off it to make a new one in my CAD program. Unfortunately, I must have mis-measured, since after I glued the mirror to the cowl and trial fit it to the nose cone, the mirror hit the lens of the camera. |
|
This turned out to be a blessing in disguise, which brings us to the second thing I learned. It has nothing to do with the video, but the material that LOC makes it’s nosecones out of. I don’t know what type of plastic it is, but I couldn’t get any of my glues to stick to it with authority. Since the cowl was going to be exposed to a lot of wind pressure, I needed a secure method of fastening it. Since my measuring error had caused the cowling to be about 1mm short, I put a piece of cardboard under it and it worked out perfectly. |

|
|
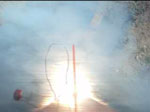
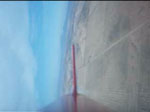
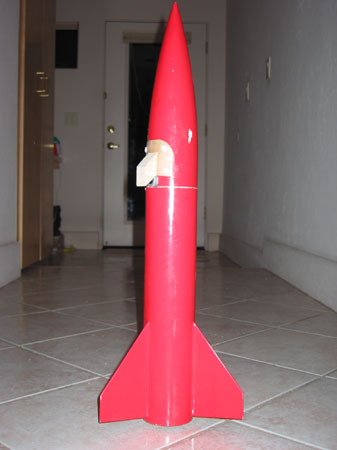
So I mounted the plywood cowl to the cardboard with medium gap filling CA glue and then mounted the cardboard onto the nose cone with nylon screws, I tapped the holes in the nose cone. I also put small strips of clear packing tape around the mounted cardboard so the wind wouldn’t go under the front of the cowl and rip it off Here it is, in it’s completed form and here are the first, and only so far, videos. Will open a new window: QuickTime Movie 4.5MB, DiVx AVI 320 x 240 3.5MB, and DiVx AVI 160 X 120 1.4MBActual files: QuickTime Movie 4.5MB, DiVx AVI 320 x 240 3.5MB, and DiVx AVI 160 X 120 1.4MB Launch site is Tucson, AZ, home of Southern Arizona Rocketry Association. Hope this was informative, and not too boring or long. glen_ba2000 on Yahoo VidRoc Group You can email me at glen_ba2000 at yahoo.com.
|